Posts

Showing posts with the label Windows 10

Windows 10 Right Click Issues [Fix]

Image
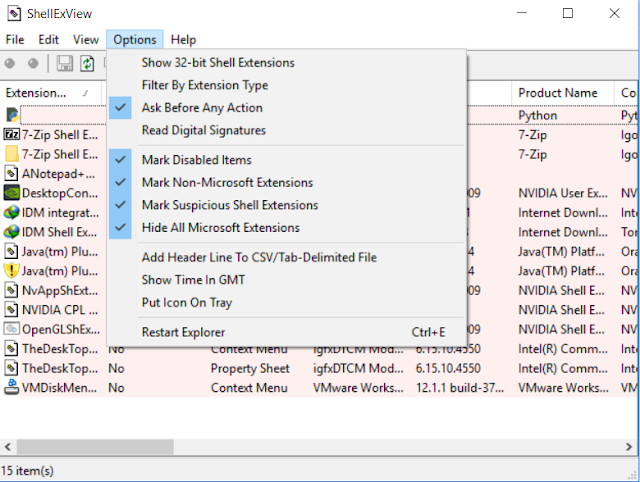
Follow @aashutoshrathi People also search for : Windows 10 Right Click Hangs PC , Windows 10 Right Click Crashes Explorer.exe Many Windows 10 users around the globe are facing some issues with right click. Problem : explorer.exe crashes whenever you right click on a particular file type like *.pdf or *.xlsx. Reasons : Major reason behind this is that somehow you managed to damage your shell extension file for those particular extension, so for your safety don't allow them to run and instead crashes itself ( like Suicide Bomber ). Fixes : Here, you are not just going to fix it, but I'm about to provide you a permanent solution for such conditions. 1. Download ShellExView from ShExView . 2. E xtract the zip you just downloaded. 3. R un ShExView.exe as with Administrative Privileges. 4. Now click on Options and set the configuration as described in picture. 5.  Select all by using Ctrl + A 6. Press red button on top right corner. 7.  Now p

How to fix Windows 10 brightness control not working issue

Image
How to fix Windows 10 brightness control not working issue YouTube Microsoft's latest addition to the Windows family, the Windows 10, has so far evoked mixed response from users around the globe, as the launch has been a resounding success with the latest claims suggesting as many as 27 million installations on PCs worldwide. However, the Windows 10 free upgrade from Windows 7 or 8.1 also brings its own share of bugs and installation issues including problems with adjusting display brightness on some PCs. Redmond Pie reports that the problem manifests itself by not allowing users to increase or decrease the brightness of the connected display on Windows 10 machines. In other words, it means laptop and notebook users cannot reduce the screen brightness when a low battery situation arises. Nevertheless, folks at Redmond Pie have shared a simple step-by-step guide to fix this problem easily: Steps to fix Windows 10 brightness control not working issue Redmond P

How to Change MAC Address in Windows

Image
First open run dialog box and type ncpa.cpl Select appropriate network connections adapter and click on  Properties Click  Configure  button to go through the next step. Under “ Advanced ” tab you should see an item called “ Network Address ” click on it. (See figure below as an example) On the right side, under “ Value ”, type in the New MAC address you want to assign to your NIC.  To verify the MAC ID, simply go to command prompt  and enter the command  ipconfig /all . Win7 MAC Address changer  is a freeware windows program which can change the MAC (Media Access Control) Address of many wired and wireless network adapters. Win7 MAC Address Changer is capable of  spoofing  MAC Address in all major windows systems including Windows XP ,  Windows Vista  and Windows 7  &  Windows 8  (both  32bit  and 64bit  systems). Download Technitium MAC Address Changer Technitium MAC Address Changer allows you to change (spoof) Media Access Control (MAC) Address of your Networ

Windows 10: The first 5 things you need to do immediately after you install it

Image
Windows users, it’s time to breathe a collective sigh of relief. After what seemed like an eternity trapped in the clutches of Windows 8, Microsoft’s latest and greatest operating system is finally here to save us. Tech bloggers the world over have sung Windows 10 praise. Is it really that great, or is it just that anything is better than the nightmare that was Windows 8?  Who cares?  Install it right now and you’ll never have to deal with Windows 8 again. In a recent post, we told you  how to skip the queue and install Windows 10 right now . Your job isn’t done once you’ve got it installed, however, because there are a few things you need to make sure you take care of right away. Kill Wi-Fi sharing By default, Windows 10 is set up to share your Internet connection over Wi-Fi. This is a nifty feature if you want it, and a dangerous one if you don’t. To be on the safe side, you should probably just disable it right from the get-go. Open the  Settings  app from the